When it comes to features such as changing the font size, scrolling, theme colors and the auto-night mode they are still available in iOS 12 if the book that you are reading supports it. Tap on the aA icon on the top menu, and you will see the familiar settings including enabling/disabling the Auto-Night setting.

Basic Navigation Tabs in iOS 12 Books
The main tabs on the user interface are now the ‘Reading Now’, library, Book Store, Audiobooks and the Search tab.
Reading Now is where you will perform most of the user actions. When you buy a new iBook/Book, it goes straight to the ‘Want to Read’ section on this tab. This tab features all the titles that you are currently reading, your reading wish list along with recommended titles.
The library is similar to the old ‘My Books’ tab in iBooks. Books can be sorted manually in the My books tab via drag and drop actions making it convenient.
The new Books App now features a dedicated ‘AudioBooks’ section. When you want to download a new Audiobook, you will use this tab to do so. Your older audiobooks will be shown in the Library, and Reading Now tabs.
In this article, we will highlight some of the fundamental changes when it comes to iBooks/Books related action sequences in iOS 12.
How to Hide or Unhide books in iOS 12
There are many reasons why you would want to hide a book from your Reading Now /Library in Books. One of the primary use-cases of this feature is to hide books that show as downloading from iCloud or need to be downloaded from iCloud.
How to Hide Books in iOS 12
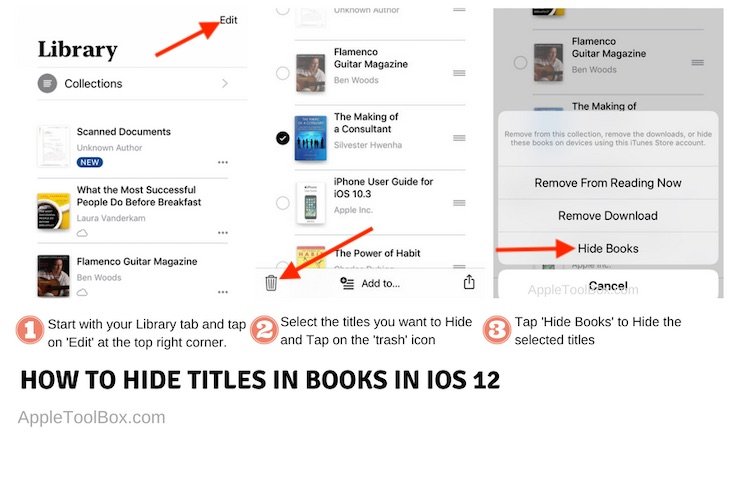
- Start with the Library tab as this is where all your books are stored
- Tap ‘Edit’ on the top right corner of your screen
- Choose the titles that you want to hide
- Tap on the Trash Can icon on the bottom left corner of your screen
- Choose ‘Hide Books’ to hide the titles selected.
- These titles will now be removed from your library and Reading now tab
How to Unhide Books in iOS12
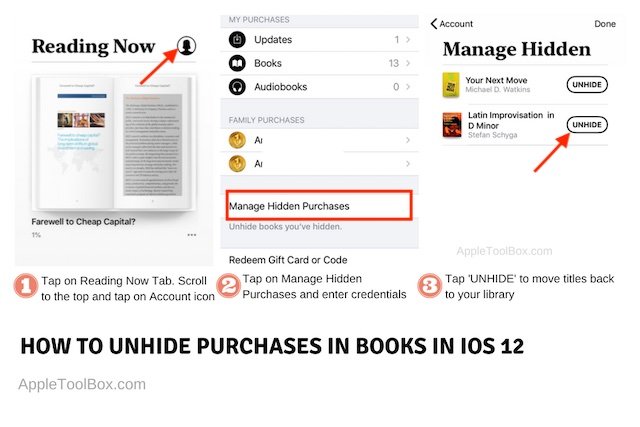
- Start by tapping on Reading Now Tab and scroll to the top
- Tap on the ‘Account’ icon at the top right corner of your screen
- Next, Tap on ‘Manage Hidden Purchases’ and enter your credentials
- You will now find all the titles that you had previously hidden
- Tap on ‘UNHIDE’ to move the titles back to your Library / Reading Now Tab
How To Use Books Wish List Feature in iOS 12
Adding and Removing Books to Your Wish List
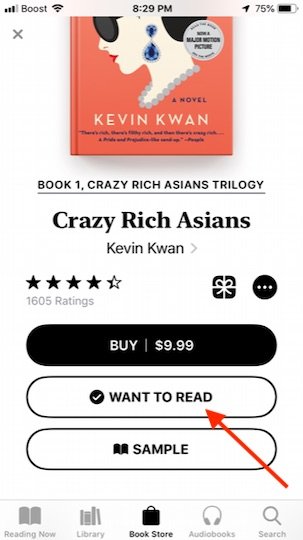
With iOS 12, now there is a separate section for your Books wish list. Apple had introduced wishlist features for other apps and store in prior iOS releases. Now iOS 12 brings you the Wish List feature for Books via the “ Want to Read” section in the Books App.
When Browsing through the Book Store tab, tap on any book and then tap on “Want to Read”. This action will add the book to your Wish List. ( You may have to scroll up a little bit to find this button!)
Sponsor Ads:
Jihosoft iPhone Data Recovery:https://www.jihosoft.com/recovery/ios-data-recovery.html
Jihosoft iPhone Data Recovery
Free iPhone Data Recovery Software for Windows/Mac
Recover up to 12+ types of files, including contacts, SMS, photos, WhatsApp, Viber, notes, etc.
Restore lost data from iOS devices directly or from iTunes and iCloud backup
Recover iPhone data lost due to iOS upgrade/jailbreak, accidental deletion, device lost or broken
Support all the latest iPhone, iPad and iPod Touch.
Tips:
How to transfer messages from iPhone to iPhone
Must read:iCloud activation lock removal
If you use android phones, please choose Gihosoft Android Data Recovery.
Similarly, when you tap again on a book in the store that is already in your wish list, it is removed from your Wish List.You may also like: iPhonerecovery.com
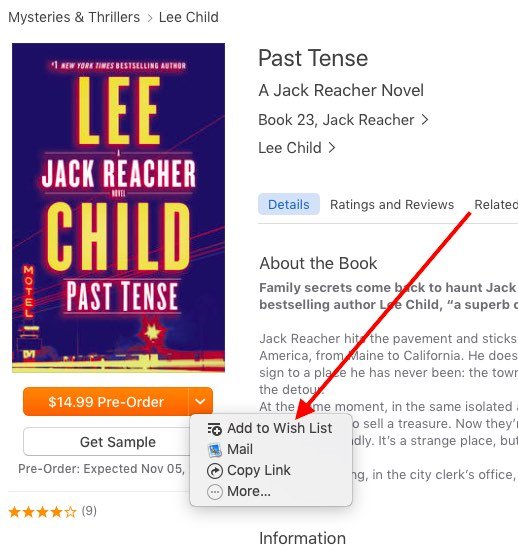
The Wish List functionality in Books is also available on your MacBook running macOS Mojave.
When you are in the process of browsing Books in the macOS Book store, you can click on the Pre-order button options for “Coming Soon” books and choose to add the title into your Wish List.
The same functionality also exists for the AudioBooks tab. When you are browsing the audiobooks in the audiobooks tab, you can click on a title and then add it to your wish list via “Want To Read” functionality.
Managing Books in Your Wish List on your iPhone or iPad
Managing your wish list is done via the “Reading Now” tab on your iPhone Books app.
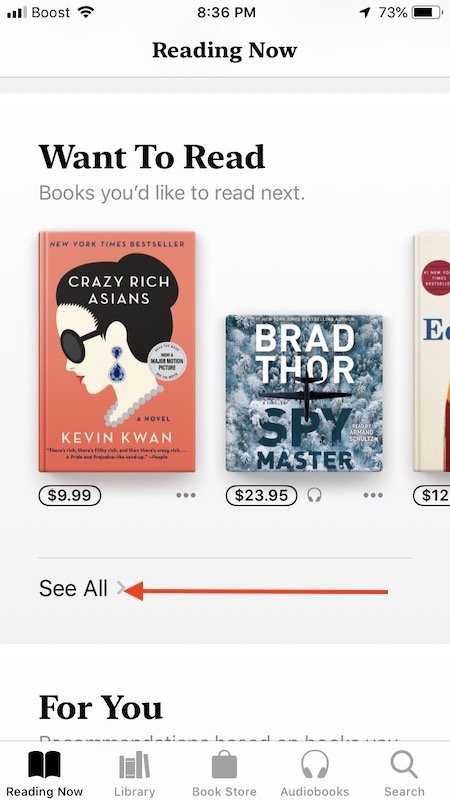
In the Reading now tab, scroll down and tap on the “See All” button under “Want to Read” section to open all the items that have been added to your Wish List. This section only shows up when you have added books/Audio titles to your wishlist.
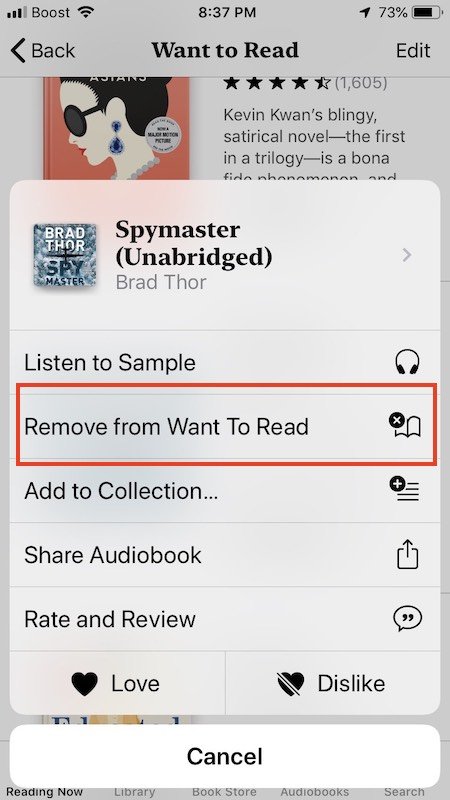
You can remove the items from the “Want to Read” list by tapping on the three dots next to the book.
How To See Only Downloaded Books in iOS 12 Books App
We haven’t seen a direct way to filter out only the downloaded titles while using the ‘Reading Now’ section in the new Books App.
RELATED:
- iBooks Missing After iOS Update, Here are some Tips
- Books Not Downloading and Related Problems
- Books Store Shows A Blank Screen, How-To Fix
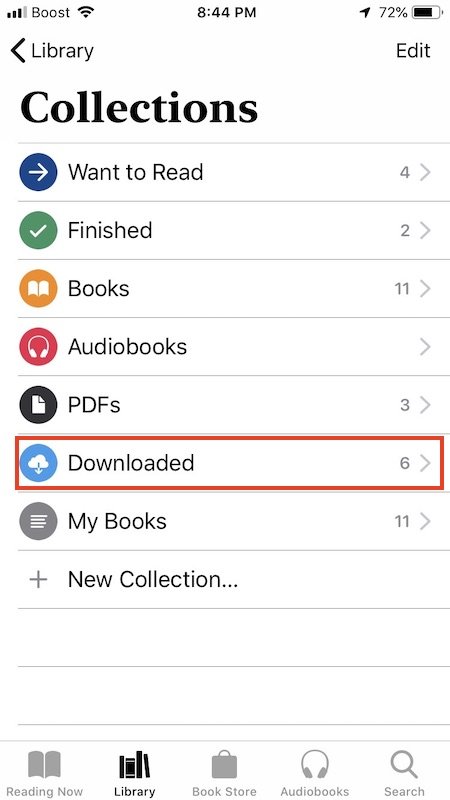
The way to view the various downloaded books on your iPhone / iPad Books app is to tap on “Library” > Collections > Downloaded. This will show you all the Books that have been downloaded to your device and are available for you to read in the reading now section.
We will be sure to update this section if we can find a better way to see only the downloaded titles on a device.
How to Save PDF’s from Web into Books App in iOS 12
Many users like to store their PDF’s into Books app, so that it makes reading easier. The functionality around saving PDF’s from the web into Books has not changed all that much in iOS 12.
- On your iPhone using Safari, tap on the ‘Share’ button at the center of the bottom screen.
- Next, Choose ‘Copy to Books’ and the pdf is automatically added to your Library in the books App
- You can also choose to create a PDF of the webpage by tapping on ‘Create-PDF’ and then Copy it to Books, in the case the actual webpage is not a PDF.
One important caveat to using PDF’s in iBooks is that if you want these downloaded PDF’s to sync across your Apple devices, you will have to enable the iCloud Drive in the Books Settings.
How To Delete Books from iPhone or iPad when using iOS 12
The delete books functionality has not changed much in iOS 12. To delete a book or some books, you start with the ‘Library’ tab.
Tap on Edit at the top corner of the screen and then select the titles that you want to delete from your iPhone or iPad.
Next, tap on the delete icon (trashcan) at the bottom left corner of your screen. You can either choose ‘Remove From Reading Now’ to remove the book from the Reading Now section or Remove download to remove it entirely from your device.
When a book is removed from the device, it can be still visible in your library they have a little cloud next to them to show that they are in iCloud, and can be re-downloaded later if desired.
How-To Sign out of your Books Account in iOS 12
The ability to sign in and sign out of your Books account on your iPhone or iPad can be extremely valuable in the course of troubleshooting. To Sign Out of your Books account when using iOS 12, start by tapping on the ‘Reading Now’ tab on your Books app.
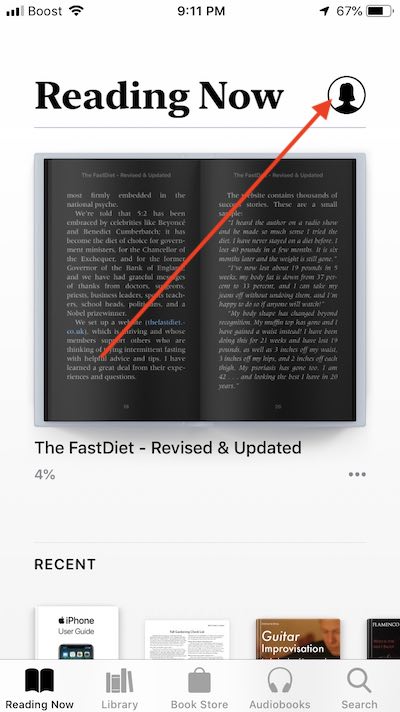
Next, tap on the account icon on the top right corner of the screen and scroll down all the way to the bottom of your screen. Here you will find the Sign out feature.
Common iOS 12 Book App Problems and How To Fix Them
Books White Screen, App Does Not Open
This annoyance has existed for some users for some time now. When you tap on Books or iBooks app, it doesn’t open the app. You simply see a white screen.
We are not sure what causes this issue on the iPhone. The only workaround that we have found is that you will have to force close the app and re-open it to work. Sometimes it can be frustrating as it takes a few tries to get this working.
If you are facing this issue, we suggest that you simply delete the Books App from your iPhone and iPad and re-install it from the App Store. Please make sure to backup your PDF’s /Books ( that you didn’t purchase from Apple) before you do this. You can also use the app off-load functionality to mitigate this risk.
iBooks/Books Not Syncing in iOS 12, How to Fix
The use of the word ‘Sync’ can be the root of the confusion. If you purchased a book using your MacBook or iPad or any other Apple device, and you cannot find the book in another Apple device, check your settings.
Before Checking the settings, please make sure that you are using the same Apple Id on the multiple Apple devices in question.
Even if you have Books Syncing option enabled, it does not make the book available on all your Apple devices.
Syncing only helps when you want to keep your collections in sync across multiple devices. For example, if you move a book into one collection in one of your Apple devices, syncing will make sure that the book is moved into the same collection in all your other devices.
The key to locating missing books or pdf’s across multiple Apple devices is to make sure that you have the iCloud Drive enabled in your Book Settings.
How to Locate Missing Books or PDF’s in Books App in iOS 12
There are certain key settings that you will need to verify to locate your missing Books in the iOS 12 Books App.
- The first and foremost is to make sure you are using the same Apple Id across the multiple devices as we explained in the prior section.
- Force quit the Books App
- Check your iCloud setting to make sure Books is enabled. Tap on Settings followed by tapping on your Apple Id
- Tap on iCloud and make sure that iCloud Drive is ON along with Books
- If either one of these settings is OFF, Please enable them and proceed.
- The next setting is about making sure when you buy a book using one Apple device, they are downloaded to other devices automatically.
- To verify, tap on Settings > Your Apple Id > iTunes and & App Store. Make sure Books and Audiobooks is enabled under ‘AUTOMATIC DOWNLOADS’ section here.
- For Books to be copied across all your Apple devices, it requires the icloud Drive setting to be enabled for Books.
- Tap on Settings > Books > and under the Syncing option, make sure iCloud Drive is ON and check the devices that you have by tapping on ‘Update Other Devices’
- The next action item is to make sure that you have not hidden the book accidentally. Please follow the steps in the prior section to check your hidden purchases/books and make sure you unhide the title in question.
- If you have already checked through the steps above, the last step is to Sign out of Your Books account / Sign Out of Your iCloud account, wait for a minute or two and then do a forced restart of your iPhone or iPad.
- Once your device starts up, Sign back into your iCloud Account, followed by your Books Account and give it some time for the books to sync.
- You should be able to locate your missing Books.
- If you were not successful, try deleting the Books app from your device and re-download it from the App store and then check.
We hope that we covered some of the key changes that you will find useful when using the new Books app on your iPad or iPhone.
Please let us know if you have any comments or questions and more importantly if you would like to share a favorite tip with the readers.


1 Comments
It is a very informative and useful post thanks it is good material to read this post increases my knowledge. Apple Developer Enterprise Program Certificate
ReplyDelete